First of all, I want to say that I’m so excited to be going on another vacation at the end of this month. Although I have proclaimed many times in the past that I’m a lover of traveling, I am getting a little burnt out from all of this back-&-forth flying & packing/unpacking. I am extremely appreciative & grateful that I am able to travel (regardless if it’s near or far), I’d just like to say that here & now. I love what I do, & I want to express my sincerest & humblest of gratitude & appreciation.

During this past long weekend, when most Americans were celebrating Fourth of July/Independence Day (also jokingly referred to as #Amexit on the Internet), Jian surprised me with an impromptu road trip to Los Angeles. He was somehow itching to go on a long drive, & he was throwing out random ideas like driving to Portland, Oregon or perhaps Las Vegas, Nevada. While I was all for driving to Portland, I didn’t want to spend too much time driving & not enough time exploring the city. So, I threw out the random idea of driving to Los Angeles. It’s far without being too far. Jian absolutely loved the idea, & we pretty much pulled this hair-brained idea out of our derrièrs at the absolute last minute.

Once we had our weekend mapped out, we pretty much had one goal in mind, well, actually two goals: 1. to revisit all of our favorite hang-out spots from our college days, & 2. to visit the California location of Lady M Café. Yes, our minds were pretty much blown away when we found out Lady M Café opened a location in Los Angeles. Our minds were blown even more (if that’s even possible) when we found out that this shop was only 5 blocks down the street from our hotel. Needless to say, being a huge cake lover, I made several trips to this shop, & I do not feel one bit guilty for eating so much cake.

What makes Lady M so special? Well, they specialize in various delicate cakes, but their absolute specialty & signature cake is the infamous Mille Crêpe Cake…a cake so delicate & delicious that I would do just about anything for a slice of this creamy crêpe heaven.

What is Mille Crêpe cake? Well, it’s a French invention, but has been popularized around the world by the Japanese. It’s basically a stack of thin crêpe sheets with thin layers of soft cream in between the sheets of crêpes. These cakes, in more recent years, have expanded from the traditional vanilla flavor to other flavors (i.e. matcha, coconut, chocolate, etc.). My favorite flavor will always be the classic vanilla flavor.

lady m los angeles

This is a sample of the various cakes we bought for our friends. From Top Left: coconut crêpe flavor, Courrone du Chocolat, matcha crêpe flavor, strawberry Mille Feuille. Bottom Right: signature flavor.

Over the years, Jian & I have tried various forms of this cake, but we could never find anything as comparable to the first place we ever experienced this golden unicorn of cakes.

la voie crepe cake

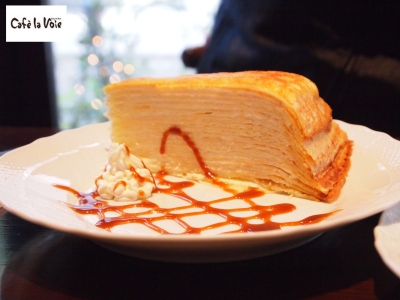
Café la Voie in the Shinjuku district of Tokyo is where we first encountered this cake. It is so beautiful & delicious, I nearly burst into tears every time I eat Mille Crêpe cake at this café.

harbs choco crepe cake

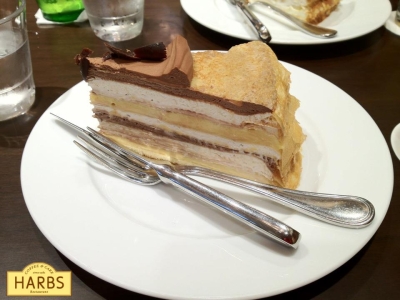
HARBS is also another famous high-end cake shop in Tokyo that has their own crêpe cake recipe. I tried this chocolate explosion just to compare the flavor to the original. This one is very, very sweet, so proceed with caution if you’re not a sweets fan. This cake was also particularly dense, which I was not used to.

We’ve had various crêpe cakes from here to there & everywhere in between. Some of the the chain coffee shops in Tokyo have Mille Crêpe cakes that are also as delicious as the high-end cake shops. Chain shops like DoutorExcelsior (which are like the Starbucks & Peet’s equivalent in Japan) have some of the best inexpensive crêpe cakes.

Back in the States, I’ve had my fair share of ups & downs with this elusive cake. Many years ago, there was a Japanese restaurant that had opened in Japantown. The pastry chef that worked at that place specialized in Mille Crêpe cake. Jian & I were so ecstatic that there was finally a place near us where we could eat this cake again. Sadly, after 2 years this restaurant closed & the pastry chef moved on.

There have been other American restaurants all over the city that have attempted to serve their version of the Mille Crêpe cake (eg. Café des Amis, Cockscomb, & Hog&Rocks), but somehow they weren’t able to quite grasp the light, airy, soft texture of the cake. Some of the cakes were just too dense, too hard, too sweet, too dry, &/or too over-the-top in avant grade flavor for such a delicate cake recipe. I just cannot wait until I go back to Japan at the end of this month & will be able to try the original cake recipe once again. Yessssss!
In other news, like I’ve said in my previous blog, I’ve decided to decorate my new backpack, & I’ve already begun the process. So far, I’ve only added two things to my backpack, a keychain & a pin, but I’m in love with the progress.

hellolulu chain

I chose this Rilakkuma bird keychain because it fit with the yellow color scheme of my backpack. Also, I liked how it was a small discreet size without being too tiny to notice.

hellolulu pink

I chose this Victory V hand emoji pin because I using this emoji often on all of my social media accounts. It’s my favorite emoji icon to use.

Well that’s just about all I have to say for now. I’m sorting through all of my things to pack for my next trip. Three weeks will really sneak up on you fast. Cheers!

Today’s song of the day:

In anticipation for my next trip to Japan, I got myself a new backpack. Jian offered to lend me his backpack, but his is too masculine looking & large, & it would make me look like an odd shaped turtle waddling down the slim streets of Kyoto. Therefore, I opted to pick out my very own backpack. Why buy a backpack? Well, Jian & I have been using his backpack on our last several trips, & it is such an incredible convenience. I hate hauling around my over-sized & cumbersome purse when I’m on vacation, especially when I’m traveling to a hot weather destination. Also, I hate it when I constantly have to stop & adjust the strap(s) of my purse. Well, I could get myself a travel purse, but let’s face it. Those travel purses look like old lady bags (no offense to women of an older age…) & they’re just overall unattractive (& more expensive than the backpack I just got). A backpack is so much cooler looking, even though they still scream “Look at me! I’m a bloody bumbling tourist.

Originally, I had bought a backpack from the brand Fjällräven, but I had to return it because I had picked the wrong size. I accidentally got the child-sized bag instead of the adult size, & to my defense, the website was very confusing in their description. They don’t ever mention the dimensions (i.e. height, width, etc.) of the backpack, but instead they list how many ‘litres’ the bag can carry. Since I’m not familiar with the European metric system, obviously it was harder for me to figure out. I was going to exchange the backpack for a larger size, but decided it would just be easier to return everything & get something else for myself. I was a little bummed that this backpack didn’t work out for me. It had a super cute fox patch already on it, & you know how I am about foxes (LOVE THEM, hence the blog name.)

fjallraven

This is a sample of the first backpack I accidentally chose & the backpack next to it, was the one I was intending to get. (All photo credits belong to www.fjallraven.us)

So here is the backpack I ended up getting. It’s from a brand called hellolulu, & I think this backpack is sooo much cuter & more practical for my needs than the other bag I returned. I got this backpack from Flight 001, a travel store, during their backpack & luggage campaign. I still kept the mustard-ish yellow color, & I am so happy with what I got. Here is a proper description of my backpack as described from the website:

Make your everyday commute in the city a mini-adventure. Tate is here to declutter your journey by neatly and effortlessly organizing your belongings. The main zippered compartment, with magnetic closures, features an internal padded laptop sleeve, storage pockets, and pen slots. The exterior features two side slip pockets as well as a front zippered pocket with a key clip. The bag’s water-repellant coating allows you to take this bag anywhere to do anything, rain or shine.

Features and Benefits:

  • Polyester body with water-repellant & heavy duty UTX Duraflex buckles/accessories
  • Internal laptop compartment fits up to a 13″ laptop

Measurement: 11″ x 6.7″ x 16.1″

_DSC3017

Shall I give it a name?

hellolulu5

The straps are adjustable & very comfortable.

hellolulu2

This clip attaches to the ends of your shoulder strap to tuck them neatly out of the way.

hellolulu7

The front pocket is padded & large enough to fit an iPad sized tablet, & it even has a discreet carabiner for keys. The pocket on the side is roomy enough for large water bottles.

hellolulu3

There is an additional pocket on the other side as well.

hellolulu4

I love the green accents just on the zipper pulls to give the backpack a pop of color & a break from all that yellow.

hellolulu6

The opening of the main compartment has both a zipper closure & a magnetic closure for added security.

hellolulu1

There are FOUR additional pockets inside the main compartment. The largest pocket is also padded & able to hold up to a 13″ laptop.

I am so excited to be able to use this backpack in the future. This is going to be my new travel companion from now on, so I won’t have to only rely on Jian’s backpack, & I won’t have to schlepp around my bulky purse all the time. I’m thinking that this backpack would also be perfect to use on my annual Thanksgiving tradition of visiting Disneyland. My trip to Japan is still one month away, but I’m already itching to decorate this backpack with charm straps for the zippers & patches for the front. I might just post an update on how this backpack looks after I’ve decorated it. Until then, cheers!

Today’s song of the day:

As you may very well know by now, I have been cramming my arts & crafts box, which I lovingly named Pierre, with all sorts of washi & masking tapes. It’s gotten to the point where I can barely close Pierre‘s lid. I’ve been using washi & decorative masking tapes a lot more in my stationery crafts, & I’ve even used them in spicing up a few Christmas decorations. When I brought back my new batch of washi tapes from my Asia trip, I was partly thinking that Jian would only complain that I never use these tapes, & partly thinking about ways I could use my new tapes. So, I decided to come up with a DIY project & decorate a few of my blank notebooks.

I had got the inspiration from a vlogger on YouTube who showed off a custom hand-drawn notebook that her friend had designed for her. I was so inspired by this YouTube vlogger, but alas, I cannot draw to save my life. I can barely draw stick figures, no matter how much I practice. So…instead of drawing a custom cover art, I thought about using other materials, & that’s where my washi tapes came into play. Of course, using washi & decorative masking tapes to customize something really doesn’t need any explanation, but I figured I’d show you what I’ve done & how I did it.

DIY notebooks1

1. scissors, 2. blank notebook (or any object with a blank, smooth surface), 3. decorative masking tapes of your choice

Basically, there’s three materials being used, & approximately three steps to decorating the item of your choice. First you select the decorative tapes you want to use. Next, you cut a strip of tape to the desired length of the object. At this point in the project, you can also cut your tape into various shapes & patterns. For example, you can cut the ends of the strip of tape to look like a ribbon. Finally, you affix the tape to your object. Yes, that was entirely obvious, but maybe this will give someone out there in our world wide universe some inspiration for themselves.

And…Here is the final result.

DIY notebooks

I bought these three Moleskin notebooks from Target & tried to use as many of the washi tapes from my Asia trip as possible. The first notebook is a sweet pastel theme. You can’t really see it from my photo, but the notebook is supposed to be a soft pink. I used some fabric masking tapes with some paper washi tapes to give the cover a little bit of texture. I wanted to choose colors that would stand out, but would also match the pink notebook.

The second notebook is a khaki color. At this stage of my DIY project, I couldn’t think of any specific design or pattern, until I came across my London themed tape roll. The inspiration hit me like a ton of bricks & I turned this boring notebook into a London/UK theme. I was especially proud of myself when I was able to add in the part of the tape that says “This is London“. I thought it was very fitting (& very much a lucky coincidence) that the words ended up on the bottom corner of the cover.

The final notebook in the set is a lavender color. I had already decided on using my special edition Sanrio stamp tape. I was trying to get as many of the characters on the cover as possible. I even tried to fill the entire cover with the stamp tape, but the band of the tape was too wide, so I wasn’t able to fill the cover completely without some overlap, which would cover up the stamp design. So, I ended up leaving the top portion of the cover blank, which I think makes the design look even better than if I had filled the whole cover. Filling the whole cover would have made it look to busy anyway. I added a few of my own Hello Kitty stickers just for fun, & there you have it!

I feel like although I have a very creative imagination, & I’m pretty good at decorating cards & stationery, I’m not very good at executing arts & crafts projects or DIY projects. My intentions come from a good place, but I can never really quite make it take shape. So, for me to actually finish a DIY project & it looking pretty good, I’m quite happy. Maybe this is a sign for more arts & crafts projects in the future. Cheers!

Today’s song of the day:

Calendar

March 2026
S M T W T F S
1234567
891011121314
15161718192021
22232425262728
293031  

Enter your email address to follow this blog & receive notifications.

Join 264 other subscribers